Wednesday, December 15, 2010

Dining Chairs

I bet you didn't know that there are as many shades of black as there are any other color. More on that later.

I found a dining set (table and 6 chairs) and a matching hutch for a decent price on Craigslist. Of course, they were old and ugly. And filthy. They weren't so bad except for where hands touch. 20 years of oily hands make chair arms disgusting. FYI.

Here are some before photos of the chairs. 4 chairs are armless, 2 have arms.
I took the cushions off (they screw off from the bottom) and washed the chairs. I just used some soap and water (oxy clean, actually). Check out the before and afters of the dirty spots!!!


Don't forget the undersides of the arms!
I primed with a gray primer since I was painting the chairs black.
I can't believe I don't have a photo of when I was painting them black. All that time in my garage drying and I didn't take ONE photo?

Sorry.

Anyway, remove the fabric from the cushions. Just pull out the staples. I didn't bother keeping the old cloth for a pattern since you just pull and staple.


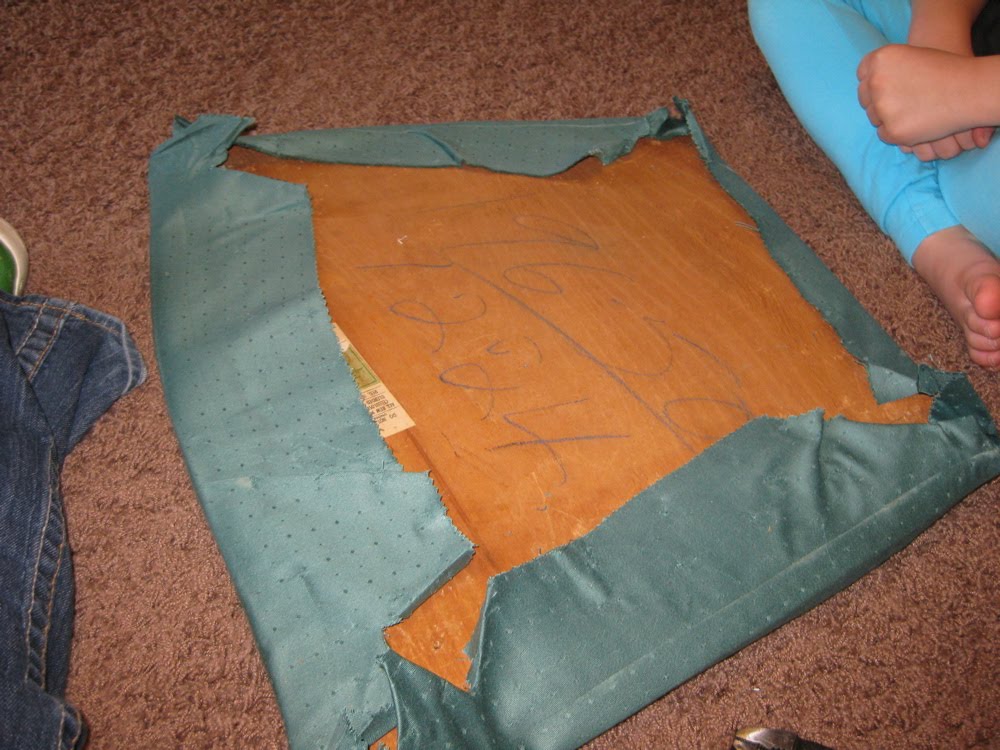
Here is how I layered it: wood seat, old foam, new foam (foam is exact same size as wood seat), batting, fabric. (Batting and fabric large enough to pull to under side of seat.)

Cutting out batting and fabric:

I ordered this fabric online from fabric.com.

Pull batting and fabric around and staple. I started in the middle of one side, then switched to the opposite side.

Then again on the other 2 sides. Just to be even.

Then stapled my way out to the corners.
Then I trimmed off some of the corner fabric to make it easier to work with.
Another view:

I found that the screw had trouble going through the fabric and batting. It just picked up the batting and wound it around and around the screw. Weird. So then I cut a little spot where the screw would go into the wood.

All stapled up:

Flip it over and admire your handy work. I didn't worry too much about the pattern. Trying to make them all match would make me lose my mind. Plus I only had so much fabric to work with.
Then screw it back into place!


About the black color. It is wrong. It is too gray. I painted the table (no photo here) first and that black was too green. Yes, green. Then this was too gray. Since it is so humid and all right now here in Oregon, I am going to just have to wait until it warms up to repaint it all with a true black. Any advice on that? But for now they work and look great! Don't you think?

Friday, December 10, 2010

Minor roof leaks

I reorganized my daughter's closet the other day. It left some room on one of her shelves so I set her up a little "desk." She couldn't have been more thrilled. (Don't you like her little formula cans? One for "brokin" pencils and one for "grat shorpinde" pencils?)
Next day, she comes to me and says, "Mommy, I was sitting at my desk and some water dripped on my arm!" WHAT???

Sure enough, water damage on the sheetrock above her closet. It happened to be right next to the attic access. So with flashlight in tow, I climbed up there and investigated.

*TIP* Don't be afraid to investigate. Grab a flashlight, look around. Know your house! Know how to access the attic. Go up there when there are no problems so that if there is a problem there is no mystery about what lurks up there. I found my attic space is clean and neat and there are no bugs or spiders to be found.

I always be sure to step on trusses and NOT sheetrock! You will step through the ceiling! I just went to the source of the leak. Found the wet spot. It was near a pipe vent that went through the roof. The vent pipe had water dripping on the sides of it. So now I knew that I had to get on the roof. Probably a crack around the pipe.

While I was up in the attic, I checked on an old leak that had been above my bathroom. Sure enough, the fix I had done the year before had failed and had also started leaking again. Luckily I caught it before it soaked any sheetrock leading to a new ceiling repair.

This is where the playhouse saved the day. When I put the roof on the playhouse, I bought some roofing cement in a tube to adhere the ridgeline shingles. I had read on the tube that it can be used in wet and dry conditions. I made a mental note, "Hey! That would have been better to use on that leak last year than what I used! If I ever have another leak I will have this handy!" I did not know such a thing existed.

So today I borrowed my neighbors ladder and climbed up there. The kids were at school and the baby was napping so this was my only chance. Since I had investigated in the attic I knew exactly where to go to find the leaks. Plus, they weren't leaks in actual plywood or anything....just near vents installed in the roof. That probably happens a lot. If there is already a hole from putting something there then it is more likely that there will be water intrusion.

I just went over to the vents and slopped some roofing cement on with a spatula spreader thingy. I am so technical. I didn't take any pictures. Since I had taken my life into my hands by walking around on a wet roof in the rain, I didn't think it was prudent to stop and handle a camera. However, you should know that come spring or summer I will probably be replacing the problem areas. This is just to get us through the rainy season.This is not my house. Wouldn't it be awesome to have a lake house though? Anyway, see that vent in the front? That lets heat escape from your attic. Mine has an itty-bitty crack at the top side. So when it rains, water collects and leaks right in. A drip at a time. But 'round here it can seriously pour. For weeks. That adds up quick. Pretty soon your ceiling starts to bubble out. And then you have to poke the bubble to let the water out. And then you have to repair the ceiling. And it is dang hard to make it match the old ceiling. And then the paint doesn't match the old ceiling paint. And then you pull your hair out. So you don't want a leak.

And see those black pipes sticking out of the roof. They are vent pipes for drains. I think. Anyway, they have a little boot at the base that helps rain to drip down the side of the pipe and onto the roof instead of down INTO your house. My little boot is cracked. In a bunch of places. The picture of my repair would also be embarrassing to show, hence, another good reason to conveniently leave the camera inside the house. Although it was kind of fun to do. Like icing a cake. In the rain. With soaking wet pants. And gritty asphalt sticking to your wet behind.

Maybe we should all occasionally look up too. Had I not made her that little spot to sit and write, Who knows when we would have found the leak!

Tuesday, December 7, 2010

Any easy one: Frame re-do

Don't you hate how expensive frames are? I needed one for a big photo of my kids. I picked this one up at my Goodwill. They are committing highway robbery over there. This one was $10 thanks to the 50% off color tag. Otherwise it was 20 bucks! For a beat-up, ugly old frame. Whatever. Even $10 was too much, IMO.

I just took it apart. Once I bought it, it was mine to do what I wanted. So I had my way with it.

Then I got it ready to paint (removed the glass).

Sprayed some primer on it (I used gray because I was painting it black).

And then I sprayed it with black spray paint. Voila!

Classy-lookin' frame for only $10 since I already had all the paint! Don't even ask what the picture cost me. Here's a tip though, take the photo yourself and upload it to Costco. A print this size would probably cost you $5.99.

Kid's Bath Vanity

This is our kid's bathroom which doubles as the guest bathroom as well. This is how the bathroom looked when we came to look at the house. Notice: pinkish walls, horrible medicine cabinet (the oak handles in the middle totally block your face from looking in the mirror), and oak backsplash.

We have not yet changed the countertop or flooring. That is for a later date. However, I know we can improve on the rest!

First, I painted it blue. I don't know why. I just did. Probably because we already had the shower curtain and such. Notice: hollywood light fixture, and the fact that I refused to put the medicine cabinet back up after it came down. We lived for quite a while with no mirror.

Recently, we decided to repaint. Mostly because I found this shower curtain for a steal and had some gray paint left over from the playhouse project. Plus I really wanted to try to build some wainscoting on the long wall. That was super fun and easy!
Next, I wanted to paint the vanity. I hate all the builder grade oak in my house. This was going to be great practice for when I want to paint the kitchen cabinets! I removed all the doors and drawer fronts.

Here is a "before" side view. Notice: crappy sticker-type veneer. What is up with that? Also notice the oak and brass toilet paper holder.

I removed the TP holder and baseboard...

...and cut some beadboard to fit. I threw it up with some liquid nails.

I sanded the doors and drawer fronts. I didn't not completely sand off the finish. I used my vibrating sander and just roughed up the surfaces.

I filled the old hardware holes with wood filler...

...and sanded the cabinet face frame.

Here is the primed face.

Primed door fronts.

At some point I decided to try distressing the edges and decided I liked the look.

I also painted the register. Brown would simply not do. You can buy new ones too but since I had the paint I decided to skip a trip to the store. Primed with metal primer and finish coated with heirloom white spray paint.

I decided on the fly to paint the oak backsplash too. No point in leaving that alone.

I put the drawer fronts back on. I have since decided I don't like the look of the distressing ON THE CABINET FACE. I will leave it on the drawers and doors but I think it just looks dirty otherwise.

I had ordered hardward online (ebay is a great place to find hardware for much cheaper than blue or orange) and had to wait for it to come. I had tried to paint my existing hinges but it didn't work out. As the hinges opened and closed, they rubbed the paint off. So I ordered those online too.
Here is a side view after I got the beadboard painted and got a new TP holder. I think the oil rubbed bronze (or black) would look much better but I had already started replacing the brass with brushed nickel shortly after we bought the house so I am going with it. If I could do it over, I would do oil-rubbed bronze.

Here are the photos of the finished product! Well, finished for now. I will be touching up the face of the base cabinet since I don't like the distressing on it. Also on the horizon: tile the floor and backsplash (I have never done this and can't wait to try!) and finding some cheap granite for the counter...Once I do that, it will take the bathroom to a whole new level! Any tips on getting a deal on granite???

Here is the white that I use. I had it color matched to my existing doors and trim. It is like an heirloom white. I use door and trim enamel from Sherwin Williams.